
The Editing Secrets Behind 7 Days of Kesslerween
Starting in 2018, I decided instead of doing one costume and spending hours on it, I wanted to do at least 7. My goal was to create each costume with things I had around the house or could throw together easily, snap some photos, and call it a day.
It is so much fun, a little stressful, and gives me space to be creative in a different way than usual.


This post contains affiliate links! Read my disclaimer for more information :)
1. Cleopatra and Sparrow the Pharoah
As a crazy cat lady, I wanted to incorporate my cats into at least one photo. I knew Cleopatra would be the perfect one since cats were so highly valued in Egyptian culture. For my outfit, I bought a cheap (but amazing) wig on Amazon, used an old cut up sheet as my “linen” Egyptian dress, and raided my moms only jewelry drawer for the rest of the pieces.
My necklace is actually a removable purse strap, my headpiece is a tarnished old necklace, and my belt is a backwards stretchy belt. My makeup was a disaster because my eyes were watering so much, but luckily that didn’t show in the photos and I stayed away from doing head shots.
Sparrow is wearing a piece of paper I cut and painted, then taped around his neck. He was such a good sport and was totally chill wearing it since I made it pretty loose.
Before photos
Photo on the left – Sparrow being a good boy sitting on the stool with his hand-painted paper necklace.
Photo on the right – completely unedited, straight-from-the-camera photo.


Post production
I took the photos of Sparrow separately from the self-timer ones of myself and edited them together in Photoshop. Lighting was all edited in Lightroom – the actual lighting wasn’t great since I just took this in my room. I heal-brushed out a screw that was in the wall above my head.
The sheet I was wearing stuck out in the back, so I edited that bit out. I also fixed the wig which was looking a bit ratty with the stray hairs.
Final photo

2. Lagoon Mermaids
This is one that my mom and I have been wanting to do for years! My mom has always said she wanted my sister and me to do a mermaid shoot in the hot tub, so this was the first costume we did! I did some subtle mermaid makeup, grabbed my old Victoria’s Secret bikini top, and convinced my sister to participate.
My mom stood on the bench above the hot tub to get photos from as straight up as possible. Kylie and I hung off the edge of the hot tub with our legs and held a couple pieces of seaweed.
Before photos
Photo on the left – This is what it looked like coming out of Lightroom with the edited lighting and lagoon water. Before editing in more seaweed and our tails.
Photo on the right – Completely unedited photo!


Post-Production
Something I really love doing is using Adobe Lightroom and Photoshop to create a perfect finish to my Halloween looks. On principle, I don’t Photoshop anything about my face or body besides lighting.
In this one, I added a hint of a mermaid tail to both Kylie and my torsos, but did not alter the shape of our bodies in any way.
I also duplicated the seaweed since we only had a couple pieces and darkened the water for a more “eerie lagoon” look.
Final Photo

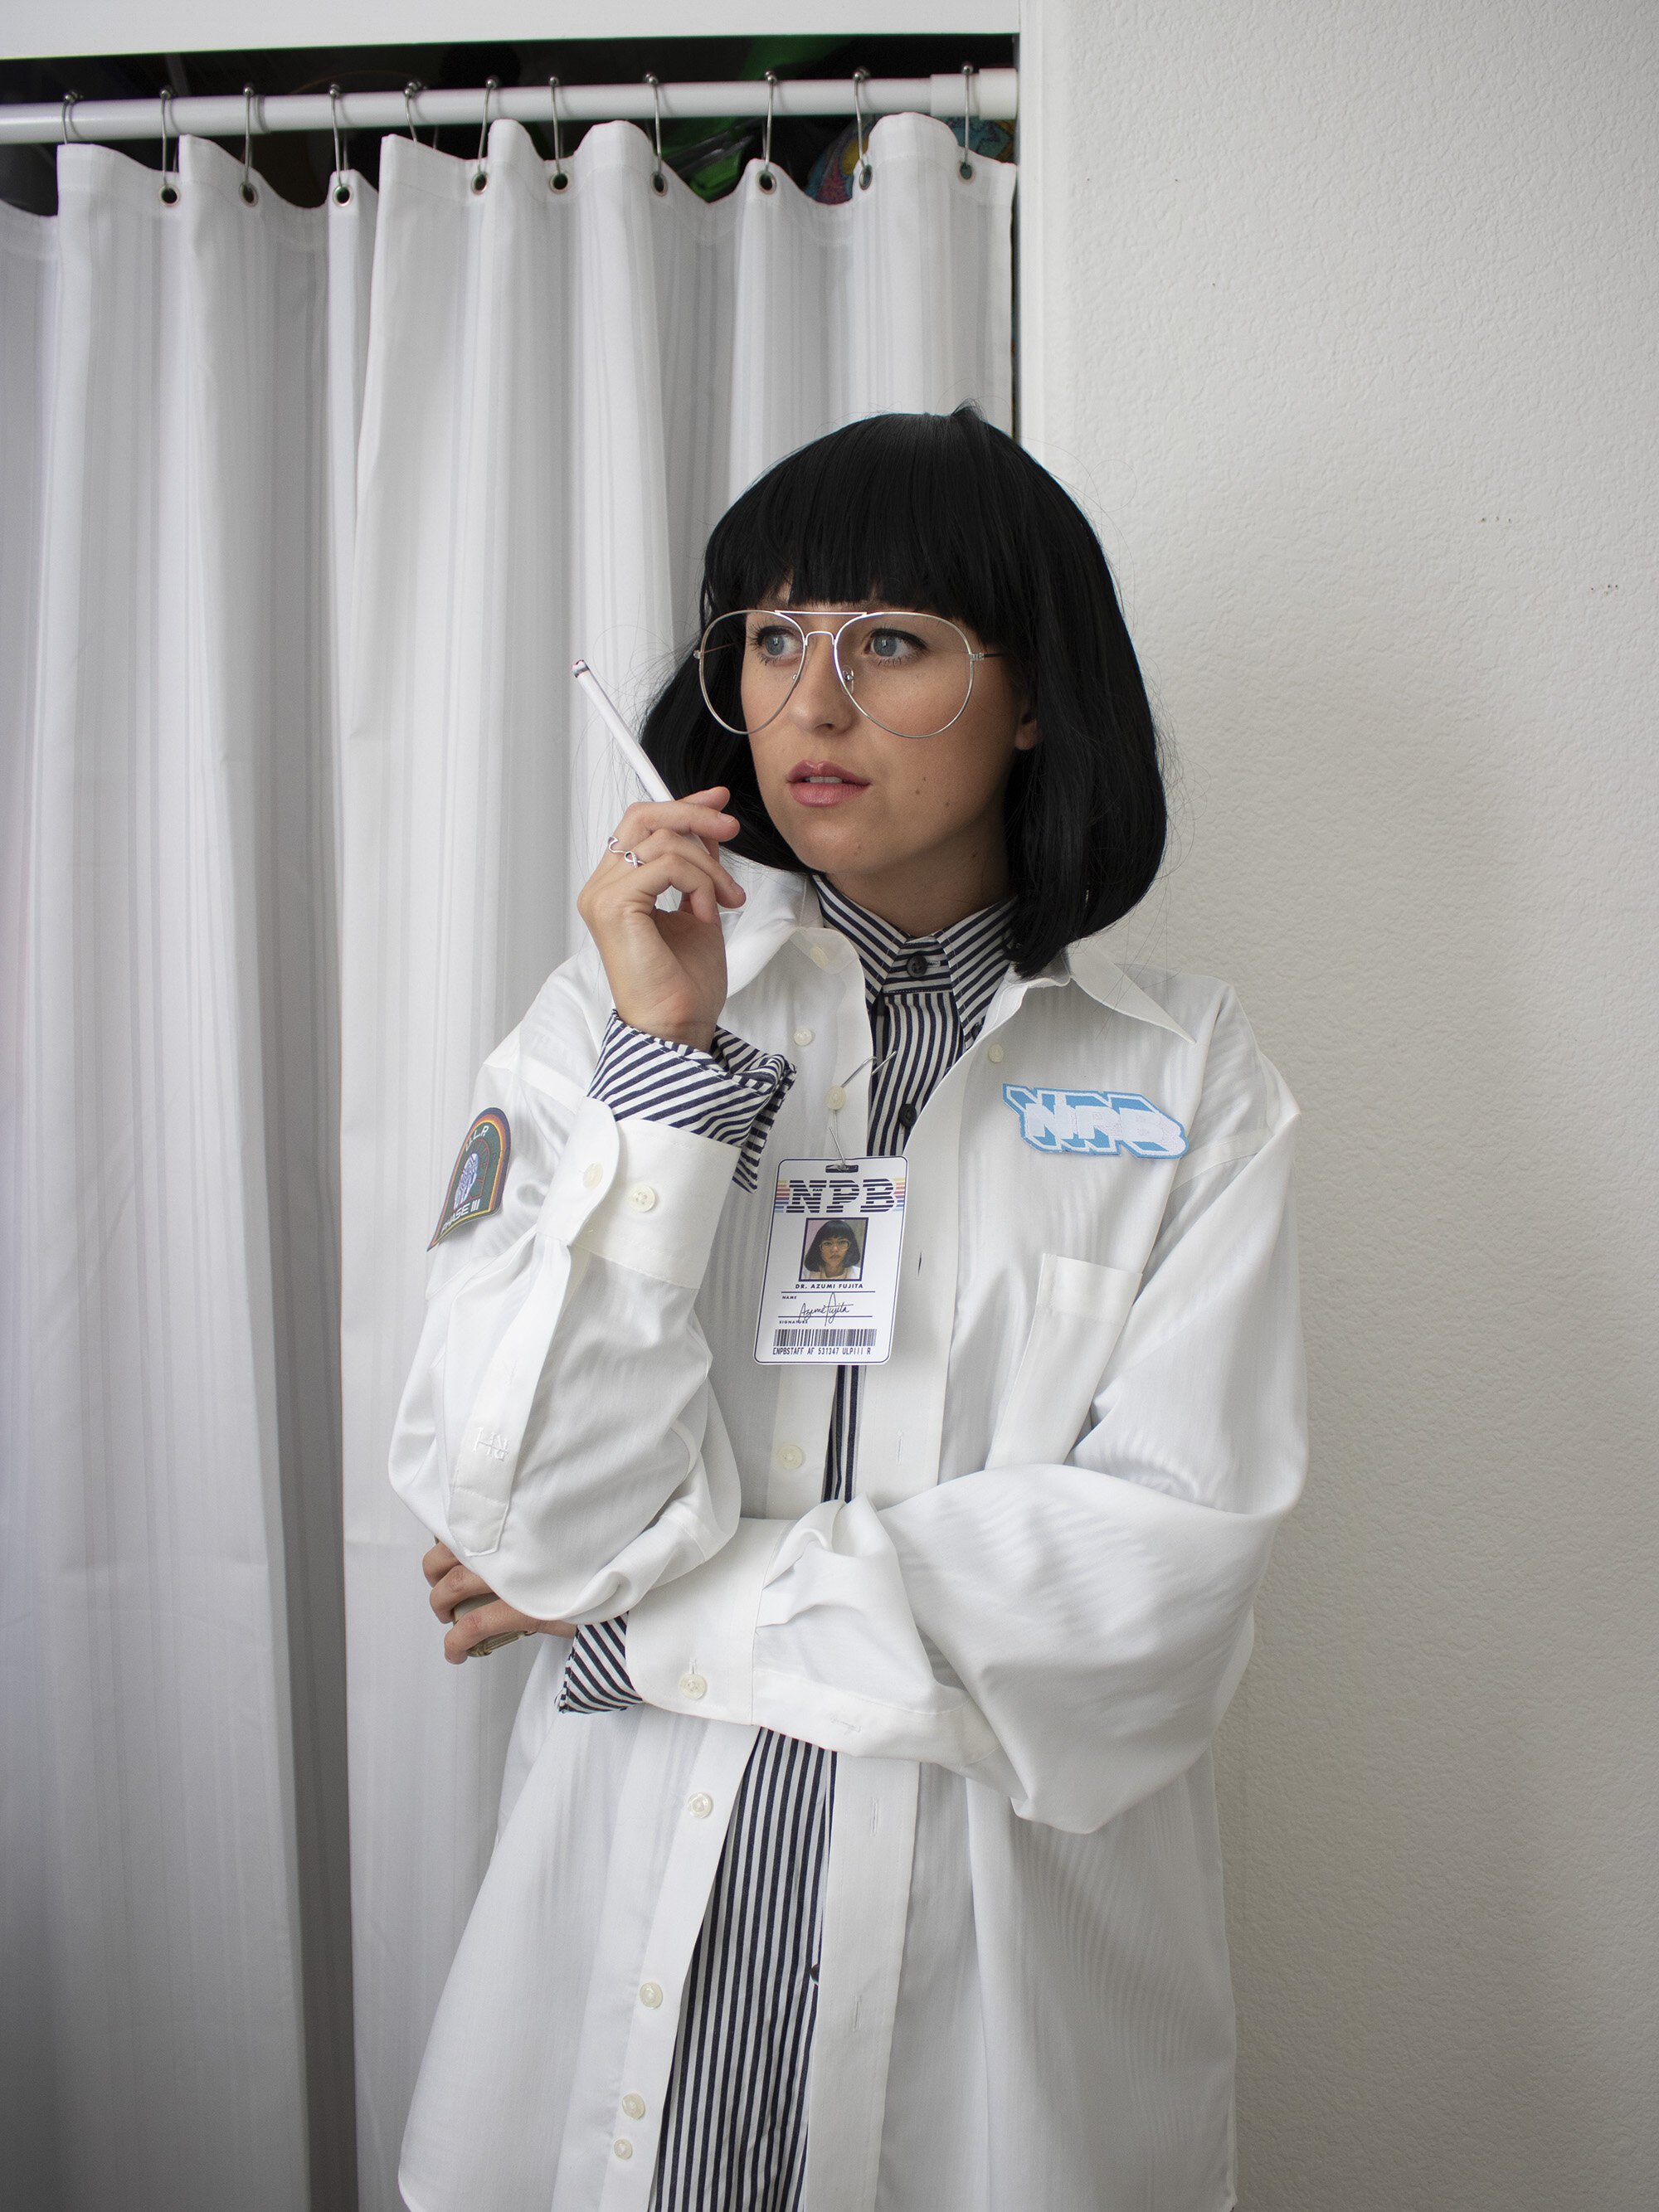
3. Dr. Azumi Fujita
When I got this wig, Dr. Fujita wasn’t what I originally had planned for it (see: Cleopatra), but it was a costume I really wanted to do last year. The wig I got was too long so I tucked it into my shirt collar to make it look like a short bob! The “patches” and name tag are just printed paper attached with tape and a paper clip.
My shirts are 2 of my dad’s old work shirts I temporarily stole from his closet for this shoot. The glasses are 99c Store sunglasses with the lenses popped out. The cigarette is just rolled up cardstock with some marker for the “burnt” end.
Before Photos
Left Photo – Completely unedited and straight from the camera. I usually shoot a bit darker, but I’m happy with the lighting!
Right Photo – After editing in Lightroom. Color editing, lens correction (it distorts when it is shot this close), and sharpening.

Post-Production
The little bump in the wig was edited out and the curtains were changed to pink to reflect the original photo I was recreating (see below). The smoke was edited in and the background was blurred – I don’t have a fancy lens to blur the background this close to the subject.
Final Photo (and reference)


4. Sally (Nightmare Before Christmas)
I’ve been wanting to do this one for a while and even bought the makeup to do it last year. Well, I finally got around to doing the full makeup this year! It started with a plus-sized, $8 clearance dress from Target which I sewed to fit me and then hand-painted the patches and stitches.
The wig is from Amazon and the photo showed that it was straight, but when it arrived it was incredibly curly. Bummer.
I used magnets on the fridge in our garage to hold up a black towel as my backdrop.
Before Photos
Left – Completely unedited, straight from the camera.
Right – After taking it into Lightroom/Photoshop.


Post Production
I filled in more of the background to be completely black, brought up the exposure, and brought down the backs for more contrast. I darkened the black paint on my neck for more of an effect. Once I imported it to my phone, I decided to put one of my Lightroom Mobile presets on it.
Final Photo

5. Sarah Sanderson (Hocus Pocus)
I ALMOST didn’t post this because I had such a bad time taking and editing these photos. The lighting was way too dark (took this at night in a poorly lit room), I couldn’t find a background that looked realistic enough to edit, and I was running out of time. They turned out okay, but they’re still not up to the standard I wanted them to be.
The bustier and skirt are part of my aunts old Renaissance outfit, the long sleeve is a sweater from my closet, and best of all, my “cloak” is a sweater draped on my head and safety pinned under my chin.
Before Photos
Left – Completely unedited, straight from the camera. SO dark!
Right – After editing in Lightroom and bumping up the lighting (exposure, shadows, etc.).


Post-production
This photo took the longest of all of them. I cut myself out and pasted me into a woods background I found on Google. The lighting of my photo doesn’t match up with the woods photo, but I lightened some areas of my skirt to match the dappled light in the background photo. Since I shot with such a high ISO (800!!) and in a low-light room, the photo is grainy and low-res, but oh well.
Oh! And I forgot to draw a mole on myself while doing makeup so I photoshopped one it.
Final Photo

6. Joker
I went to see this movie an hour after doing the makeup and taking these photos. Don’t worry, I took the makeup off before going to the movie. I bought the turquoise, collared shirt from the thrift shop specifically for this costume – it was only $4! I wore my v-neck sweater that is the most yellow thing I could find that semi-worked for this. The outer layer is a red peacoat I got from the thrift shop last year.
The face paint is a white lipstick – the cheap white face paint I bought was awful so I used a Wet N Wild lipstick all over my whole face. Yup.
I was not about to risk my hair being permanently green, so that was all edited. The photos were taken in my room against my bedroom wall. I had to move my cats’ giant cat tree (with them on it) which they actually really enjoyed.
Before Photos
Left – Completely unedited, straight from the camera.
Right – After editing in Lightroom. Colored my hair and made the lighting more grungy/moody.


Post-Production
My original plan was to edit in a backdrop similar to the original movie still, but it just looked to fake and I decided I liked my version with the textured wall. I also used a mobile Lightroom preset on this to make it even grungier looking.
Final Photo (and reference photo)


7. Frida Kahlo
I threw this one together in about 20 minutes, took photos for 10 minutes, then wiped off my unibrow so I could go for a walk with my mom and sister. I braided my hair and pinned it up, grabbed a few fake, black flowers from the dollar tree bouquets we had, and found the chunkiest jewelry I could from my mom’s jewelry box.
I used a little palm tree bush in our backyard as a backdrop which happens to be right below the hummingbird feeder with buzzing hummingbirds all over!
Before Photo
Completely unedited, straight from the camera.

Post-Production:
This was an easy edit since all I did was change the lighting and coloring a bit. I wasn’t trying to recreate a specific photo (or painting, in this case) which made it much easier to do whatever I wanted with it.
Final Photo

Thanks for following along with #Kesslerween 2018!